Battery switch on travel trailer function is crucial for managing your RV’s power. Understanding how this simple but vital component works can save you headaches (and potentially a dead battery) down the road. This guide breaks down everything you need to know, from basic operation to advanced troubleshooting, ensuring you’re confident in handling your travel trailer’s electrical system.
We’ll cover different switch types, safe connection and disconnection procedures, common problems and their fixes, and how to maximize your battery’s lifespan. Think of this as your ultimate guide to keeping the lights on (and your appliances running) while you’re enjoying the open road.
Understanding Battery Switch Functionality in Travel Trailers
Your travel trailer’s battery switch is a crucial component for managing power, protecting your batteries, and preventing accidental drain. Understanding its function and operation is essential for safe and efficient RVing. This section will explain the purpose, types, internal workings, and proper operation of a typical travel trailer battery switch.
Battery Switch Purposes
The primary purpose of a battery switch is to control the flow of electricity to and from your travel trailer’s batteries. This allows you to disconnect the batteries completely to prevent drain when the trailer is in storage, connect only the house battery for powering appliances inside the trailer, connect only the starting battery for engine operation, or connect both batteries together for combined power.
So, you’re an audiophile who loves to travel? Awesome! Make sure you check out this guide on audiophile travel setups to keep your ears happy on the go. It’s crucial to protect your investment, and while you’re planning, don’t forget travel insurance! Securing Aon travel insurance is a smart move to safeguard your trip and your expensive gear.
Peace of mind is priceless, especially when you’re relying on your awesome headphones for that perfect soundtrack to your adventures.
This control prevents unwanted battery drain and protects sensitive electronics. It also simplifies troubleshooting electrical problems.
Types of Battery Switches
Several types of battery switches are used in travel trailers. The most common are the 1-2-Both switches and disconnect switches.
- 1-2-Both Switches: These switches offer three positions: “1” (connects only the starting battery), “2” (connects only the house battery), and “Both” (connects both batteries in parallel).
- Disconnect Switches: These switches simply provide an “On” and “Off” position, completely disconnecting the batteries from the trailer’s electrical system. They are simpler than 1-2-Both switches but offer less control.
There are also more sophisticated switches, often electronic, that offer more granular control, including remote control options and monitoring capabilities, but these are less common in standard travel trailers.
Internal Workings of a Battery Switch
A typical battery switch, like a 1-2-Both switch, is a mechanical device containing multiple contact points and a selector mechanism. The selector mechanism (a rotary switch or lever) positions the contacts to connect or disconnect the batteries based on the chosen position (“1,” “2,” or “Both”). These contacts are typically made of heavy-duty materials capable of handling the electrical current.
The switch itself is housed in a robust enclosure designed to protect it from the elements and prevent accidental contact. Internal wiring connects the switch to the batteries and the trailer’s electrical system.
Operating a Battery Switch
Proper operation of the battery switch is crucial. Incorrect usage can lead to damage to your batteries or electrical system. Always follow these steps:
- Identify the Switch: Locate the battery switch. It’s usually located near the batteries, often in a readily accessible compartment.
- Understand the Positions: Familiarize yourself with the switch’s positions (e.g., “1,” “2,” “Both,” “Off”).
- Turn Off Before Disconnecting: Before switching positions, turn off all appliances and electronics connected to the trailer’s electrical system.
- Switch Positions Carefully: Slowly and firmly move the switch to the desired position. Avoid forcing the switch.
- Verify the Connection: After switching positions, verify the connection by checking if the relevant circuits are powered (or not powered, if disconnected).
Remember to always consult your travel trailer’s owner’s manual for specific instructions on operating your battery switch. Improper use could damage your batteries or the trailer’s electrical system.
Troubleshooting Common Battery Switch Issues
Your travel trailer’s battery switch is a crucial component, and problems can leave you stranded. Understanding common issues and their solutions can save you time and frustration. This section will guide you through identifying and fixing typical battery switch malfunctions.
Troubleshooting battery switch problems often involves a process of elimination. Start by visually inspecting the switch itself, checking for loose connections, corrosion, or any signs of physical damage. Then, systematically test different parts of your electrical system to pinpoint the exact source of the issue.
Non-Functional Battery Switch
A completely non-functional switch prevents power from flowing to your trailer’s appliances and systems. This could be due to a blown fuse within the switch itself, a faulty switch mechanism, or a problem with the wiring leading to or from the switch. Check the fuses associated with the switch first. If the fuses are intact, the switch itself might need replacement or professional repair.
Poor wiring connections can also lead to a non-functional switch, requiring a thorough inspection and tightening or replacement of wires.
Flickering Lights
Flickering lights often indicate a loose connection somewhere in the electrical system, potentially at the battery switch. This can be caused by corroded terminals, loose wires, or a failing switch. Clean and tighten the battery terminals and all connections related to the switch. If the flickering persists, the switch itself may be faulty and need replacing. Sometimes, a failing battery can also manifest as flickering lights, so check the battery’s voltage to rule that out.
So, you’re an audiophile who loves to travel? Awesome! Check out this guide on setting up your audiophile travel setup for the best sound on the go. It’s crucial to protect your investment, so don’t forget to get travel insurance before you jet off. Consider looking into Aon travel insurance for comprehensive coverage; they often have options for valuable equipment.
That way, you can relax and enjoy your music, knowing your gear is safe.
Dead Batteries, Battery switch on travel trailer function
Dead batteries can result from various issues, including a faulty switch that isn’t correctly connecting the batteries to the charging system. If the switch is in the “off” position or is malfunctioning, the batteries won’t charge, even when connected to shore power or a generator. Ensure the switch is correctly positioned to allow charging. If the batteries are still dead after checking the switch, the batteries themselves might be faulty and require testing and potentially replacement.
Parasitic draws (leaks in the electrical system) can also drain batteries; a multimeter can help identify these.
Troubleshooting Techniques Comparison
| Issue | Troubleshooting Technique | Effectiveness | Notes |
|---|---|---|---|
| Non-functional Switch | Check fuses | High (often solves the problem) | Check both the switch’s internal fuse and any related circuit breakers. |
| Non-functional Switch | Inspect wiring | Medium (requires some electrical knowledge) | Look for loose, corroded, or damaged wires. |
| Flickering Lights | Clean battery terminals | High (a common cause) | Use a wire brush and baking soda solution to clean corrosion. |
| Dead Batteries | Verify switch position | High (simple check) | Ensure the switch is properly set to charge the batteries. |
| Dead Batteries | Check battery voltage | High (essential for diagnosis) | Use a multimeter to test battery voltage. |
Common Causes of Battery Switch Malfunctions and Fixes
Here’s a list of common causes for battery switch problems and their solutions. Remember safety first: always disconnect the battery before working on any electrical components.
- Loose Connections: Tighten all connections at the switch and battery terminals. Use appropriate tools and ensure a secure connection.
- Corrosion: Clean corroded terminals with a wire brush and baking soda solution. Apply a corrosion inhibitor to prevent future corrosion.
- Blown Fuses: Replace any blown fuses with the correct amperage rating. Investigate the cause of the blown fuse before simply replacing it.
- Faulty Switch: Replace the faulty switch with a new one of the same type and amperage rating.
- Damaged Wiring: Repair or replace any damaged wiring. Use appropriately sized wire and secure connections with wire nuts or crimp connectors.
Maintenance and Upkeep of the Battery Switch: Battery Switch On Travel Trailer Function
Keeping your travel trailer’s battery switch in good working order is crucial for reliable power. Regular maintenance prevents costly repairs and ensures you always have power when you need it. Neglecting this simple task could leave you stranded with dead batteries, especially during long trips or in remote locations. Proper care extends the lifespan of your switch and minimizes the risk of electrical problems.Regular inspection and cleaning of your battery switch are essential for preventing issues.
Corrosion is a common enemy of electrical connections, leading to poor contact and ultimately, battery failure. A damaged switch can also pose a safety hazard, potentially leading to electrical fires. Therefore, making preventative maintenance a habit is highly recommended.
Inspecting the Battery Switch for Corrosion and Damage
Visual inspection is the first step. Carefully examine the switch itself for any signs of physical damage, such as cracks or broken parts. Pay close attention to the terminals where the battery cables connect. Look for signs of corrosion, which might appear as a white, green, or blue powdery substance. Also check for any loose or damaged wires.
If you notice significant corrosion, loose connections, or damage, you’ll need to take appropriate steps to address these problems before they escalate. A slightly discolored terminal might just need cleaning, but significant corrosion indicates a deeper issue.
Preventative Maintenance Checklist for the Battery Switch
A simple checklist can help ensure you don’t overlook any important steps during your maintenance routine. It’s best to perform this check at least twice a year, or more often if you use your travel trailer frequently in harsh environments.
- Visually inspect the battery switch for cracks, damage, or loose connections.
- Check the battery cables for corrosion, fraying, or damage.
- Inspect the terminals for corrosion. A wire brush can help determine the extent of corrosion.
- Test the switch functionality to ensure it’s correctly switching power between batteries or shore power.
- Tighten all connections if needed.
Cleaning and Lubricating the Battery Switch Components
Cleaning corroded terminals is often a straightforward process. You’ll need a wire brush (a small, stiff-bristled brush works well), baking soda, and water. First, disconnect the battery cables from the switch. Then, use the wire brush to scrub away any corrosion from the terminals and the switch itself. Mix a paste of baking soda and water, apply it to the terminals, and let it sit for a few minutes to help neutralize the acid.
After scrubbing again, rinse thoroughly with water and allow everything to dry completely before reconnecting the battery cables. For lubrication, a small amount of dielectric grease on the terminals after cleaning will help prevent future corrosion. This grease is specifically designed for electrical connections and helps repel moisture. Avoid using petroleum-based lubricants, as they can attract dirt and damage the switch.
Battery Switch and its Impact on Battery Life
Proper use of your travel trailer’s battery switch is key to maximizing the lifespan of your batteries. Understanding how different switch positions affect your batteries and how to mitigate parasitic drain will significantly extend their useful life and save you money in the long run. Neglecting proper switch management can lead to premature battery failure and unexpected downtime on your adventures.Leaving the battery switch in various positions impacts your batteries differently.
The “off” position ideally disconnects both batteries from any loads, preventing drain. However, as we’ll discuss, this isn’t always the case. The “both” position connects both your house and starting batteries to the trailer’s electrical system, providing maximum power but also increasing the risk of rapid discharge. The “battery” position typically connects only the house battery to the trailer’s systems, useful for conserving the starting battery’s charge.
Parasitic Load Effects on Battery Life
Even when your battery switch is in the “off” position, small electrical draws, known as parasitic loads, can slowly drain your batteries. These are typically caused by things like clocks, smoke detectors, or even improperly wired appliances that draw a small amount of current even when seemingly inactive. These small drains accumulate over time, eventually leading to a completely discharged battery.
A common example is a refrigerator’s control board which might still consume power even when the compressor is not running. This constant, albeit small, drain can significantly reduce your battery’s lifespan if left unchecked.
Strategies for Maximizing Battery Life Through Effective Battery Switch Management
Effective battery switch management is crucial for preserving your batteries. Here are some key strategies:
- Always turn the battery switch to the “off” position when your travel trailer is not in use for extended periods. This minimizes parasitic drain.
- Regularly check your battery voltage using a multimeter. Low voltage indicates parasitic drain or a problem that needs attention. A healthy battery should show a voltage above 12.4 volts.
- Identify and address parasitic loads. If you suspect a parasitic drain, systematically disconnect components to pinpoint the culprit. A clamp meter can help identify the source of excessive current draw.
- Use a battery disconnect switch in addition to your main battery switch. This offers an additional layer of protection against parasitic drain, especially beneficial for longer periods of inactivity.
- Choose the appropriate battery switch position based on your needs. Use the “both” position only when you need maximum power. Otherwise, using the “battery” position helps conserve your starting battery’s charge.
- Consider installing a battery monitor to track your battery’s state of charge and identify potential issues early.
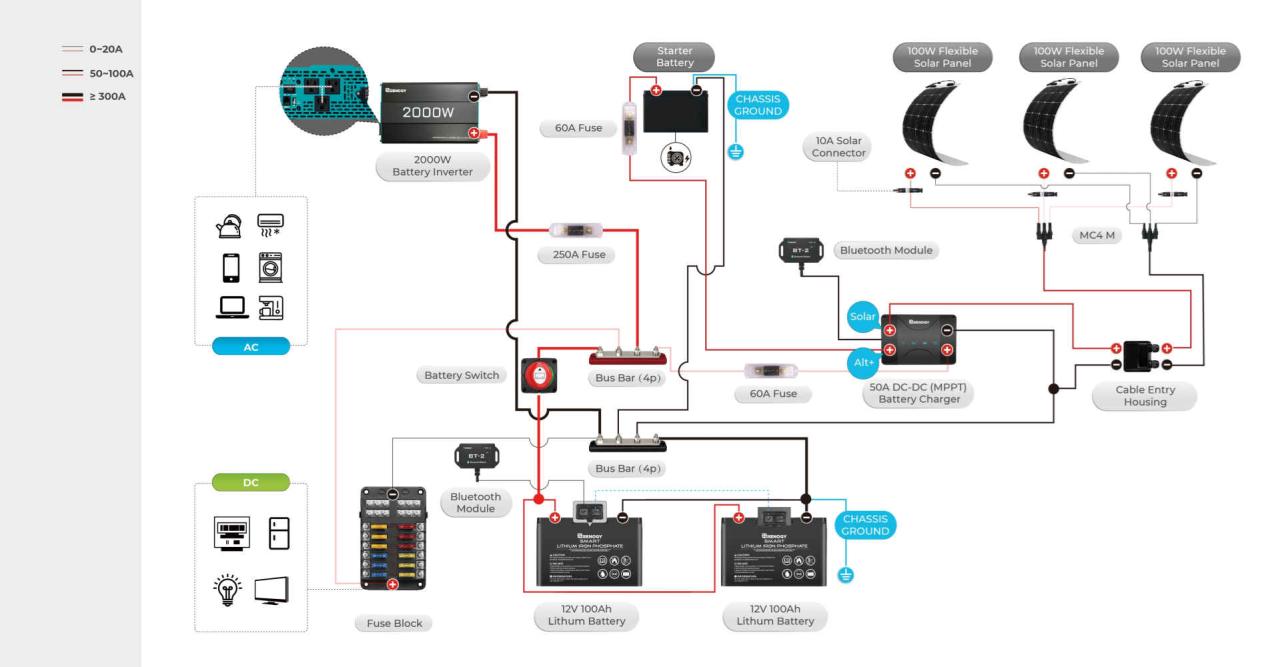
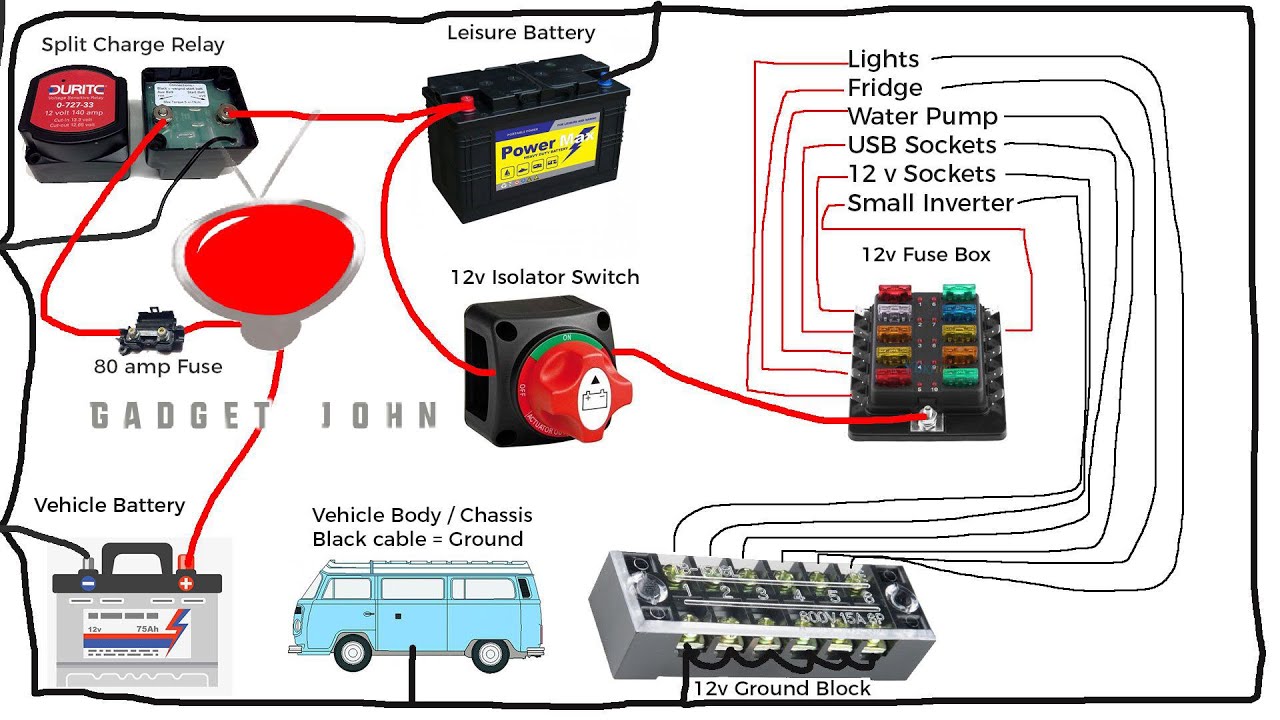
Visual Representation of Battery Switch Wiring
Understanding the wiring diagram of your travel trailer’s battery switch is crucial for safe and efficient operation. This diagram shows the typical flow of electricity, highlighting key connections and safety measures. A clear understanding prevents electrical issues and ensures the longevity of your battery system.A typical setup involves two batteries: a main house battery and a starting battery for your tow vehicle.
The battery switch acts as a central control point, allowing you to isolate or combine these batteries as needed. This ensures you can use the house battery to power your appliances while leaving the starting battery untouched for engine operation. The switch also includes a safety feature that prevents accidental short circuits.
Battery Switch Wiring Diagram
Imagine a rectangular box representing the battery switch. From the left side, two thick wires enter, representing the positive (+) terminals of your two batteries. These are labeled “+House Battery” and “+Starting Battery”. Each wire connects to a separate terminal on the switch, clearly marked with corresponding labels. On the right side of the box, another thick wire exits labeled “+Output”.
This wire carries power to the rest of your travel trailer’s electrical system. On the bottom of the switch box, two more wires enter, representing the negative (-) terminals of your two batteries, labeled “-House Battery” and “-Starting Battery”. These wires are connected to a common negative bus bar within the switch, and then a single thick wire exits, labeled “-Output”, leading to the negative bus bar of your trailer’s electrical system.The switch itself has multiple positions, typically “Off,” “House Battery Only,” “Both Batteries,” and “Starting Battery Only.” In the “Off” position, all power is disconnected.
In “House Battery Only,” the “+House Battery” and “-Output” are connected. “Both Batteries” connects both “+House Battery” and “+Starting Battery” to the “+Output”, combining the power sources. “Starting Battery Only” connects “+Starting Battery” and “-Output”. The negative connections are always connected, providing the return path for the circuit. The key safety feature is the isolation of the positive connections.
Each position only connects the desired battery(ies) to the main electrical system. This prevents accidental short circuits and ensures the system remains safe.
Mastering your travel trailer’s battery switch is key to a smooth and enjoyable camping experience. By understanding its function, performing regular maintenance, and knowing how to troubleshoot common issues, you can prevent electrical problems and extend the life of your batteries. So, get out there, explore, and let this guide keep your adventures powered!
Q&A
What happens if I leave my battery switch in the “Both” position?
Leaving the switch in “Both” connects both your house batteries and your tow vehicle’s battery. This can drain your tow vehicle’s battery if it’s not running and charging. It’s generally best to use this position only when charging your house batteries from the tow vehicle.
How often should I check my battery switch for corrosion?
Ideally, inspect your battery switch for corrosion at least twice a year, or more frequently if you’re in a humid climate or near saltwater. Corrosion can hinder electrical flow and damage your system.
Can I use a battery switch from a different RV?
While some switches might appear similar, it’s best to use a switch designed for your specific RV’s amperage and battery setup. Using an incompatible switch can lead to electrical problems or even fire hazards.
My battery switch is making a clicking sound. What’s wrong?
A clicking sound often indicates a problem with the switch itself, possibly due to a loose connection, worn-out internal components, or a faulty solenoid. It’s best to have it inspected by a qualified technician.
